How to Plant Stone Breaker (Small Leaf)
Stone breaker, scientifically known as Phyllanthus niruri and commonly referred to as “Small leaf,” is a small, leafy herb with a long history of use in traditional medicine.
The plant is native to tropical regions, including Africa, Asia, and South America, and is well known for its ability to thrive in warm climates.
They are Herbaceous annual plants (life cycle lasts one growing season).

In Nigeria, Stone breaker is recognised for its medicinal properties, particularly for managing kidney stones, liver disorders, malaria, diabetes, and digestive issues.
Its adaptability to Nigeria’s tropical climate makes it easy to cultivate in backyard gardens, farmlands, or as part of agroforestry systems.
Description of the Plant
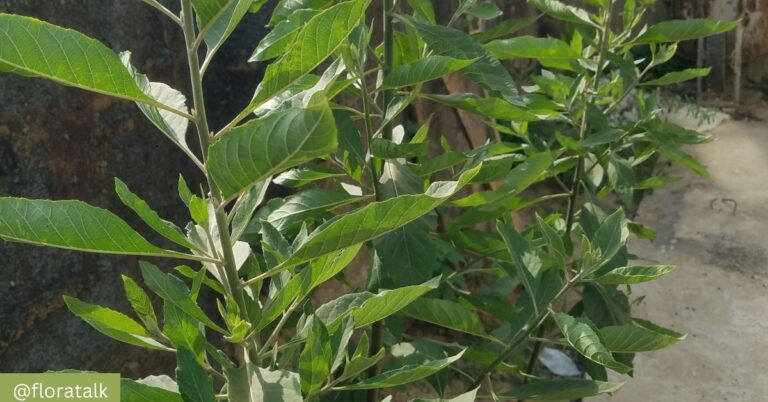
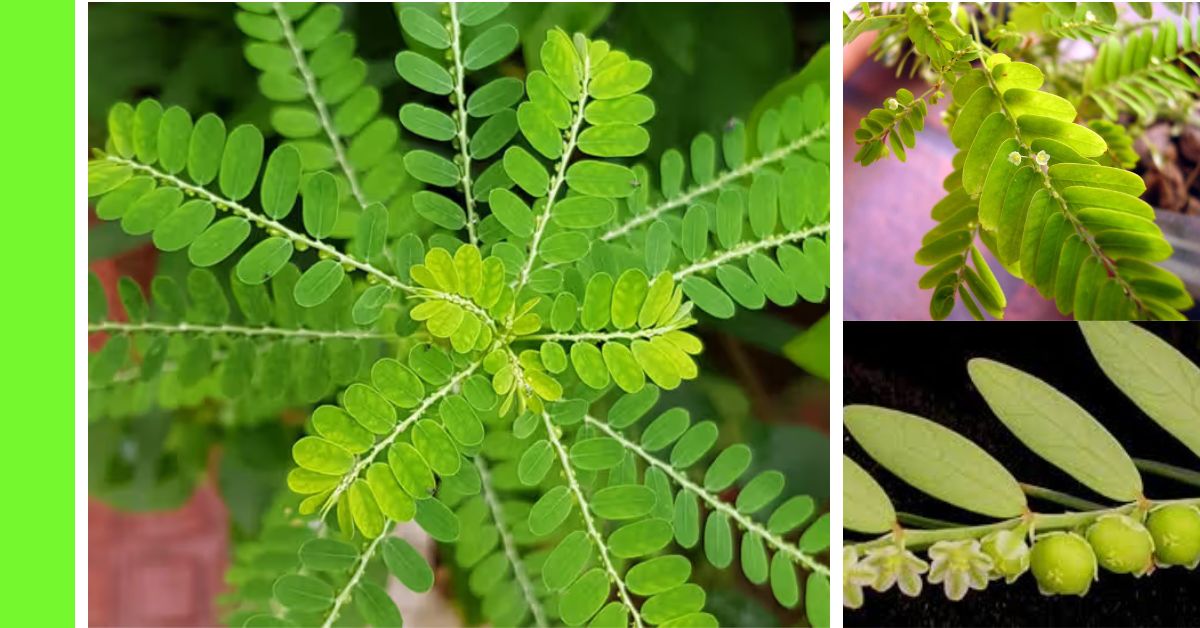
Stone Breaker is a small, delicate medicinal herb that grows 30–60 cm tall.
The stem is thin, smooth, and green, branching outward to form a bushy appearance.
Leaves
- Leaves grow in alternating patterns along the branches
- They are small, oblong, and light green
- A unique feature: tiny greenish fruits grow beneath the leaves, which is why it’s called “seed-under-leaf”
This hidden fruit arrangement is a key identification trait.
Flowers
- Very small, greenish-white to pale yellow
- Grow at the leaf joints (axils)
- Pollination happens mainly by insects and wind
Seeds / Fruit
- Produces tiny, round capsules directly beneath the leaves
- Capsules turn brown when mature and release tiny seeds
The Planting Season for Stone Breaker (Small Leaf) in Nigeria
Stone breaker thrives best during Nigeria’s rainy season, which generally spans from April to October in most parts of the country.
The plant requires adequate moisture in its early growth stages, so starting the planting process at the onset of rains ensures natural irrigation and favourable soil conditions.
However, since Stone breaker can also tolerate dry season once established, it is possible to cultivate it all year round if there is access to irrigation.
For commercial cultivation, the best time to plant is from late March to early May, allowing the young plants to benefit from the continuous rainfall.
Planting the Stone Breaker (Small Leaf)
Step 1: Choose a Location
Stone breaker grows well in open areas with full sunlight, though it can tolerate partial shade.
Choose a location that has well-drained loamy or sandy-loam soil, as waterlogging can damage the roots.
The plant does not demand highly fertile soil, but grows better when organic matter is available.
Backyard gardens, small plots, and marginal farmlands can all be suitable for cultivating Stone breaker.
Step 2: Land Clearing and Preparation
Clear the land of weeds, shrubs, and debris before planting.
Since the plant is relatively small, land preparation does not require heavy machinery; simple hand tools such as hoes and cutlasses are sufficient for small-scale planting.
After clearing, loosen the soil by tilling or digging to a depth of 15–20 cm.
This improves aeration, enhances root penetration, and promotes better water absorption.
If the soil is compact or clay-heavy, adding sand or compost will improve drainage and soil texture.
Step 3: Means of Propagation
Stone breaker is primarily propagated by seeds, which are small and numerous.
The seeds can be collected from mature, dried fruits of existing plants.
In some cases, the plant can also regenerate naturally from self-seeding if left undisturbed, as it tends to drop seeds that sprout under favourable conditions.
Find agro suppliers near you on Floratalk Hub
Step 4: How to Plant Stone Breaker (Small Leaf) from Seed
- Prepare nursery beds or seed trays if you want to transplant later, or sow directly in the field.
- For direct planting, scatter the seeds lightly over the soil surface and cover them with a thin layer of soil (not more than 1 cm deep).
- Space the seeds 20–30 cm apart in rows to allow for easy weeding and growth.
- If transplanting, sow the seeds in a nursery and water lightly until germination occurs (usually within 1–2 weeks), then move seedlings to the main field when they are 10–15 cm tall.
Step 5: Watering
Stone breaker requires consistent moisture in the first 4–6 weeks after germination.
During the rainy season, natural rainfall is often sufficient, but in dry periods, provide supplementary irrigation twice a week.
Avoid overwatering, as waterlogged soil can cause root rot.
Drip irrigation or light sprinkling is ideal for maintaining soil moisture without flooding.
Step 6: Apply Manure
Though Stone breaker is hardy and can grow in poor soils, applying organic manure improves growth and yield.
Use well-decomposed cow dung, poultry droppings, or compost.
Apply a thin layer of manure during land preparation, and top-dress lightly around the base of the plants 3–4 weeks after germination.
Chemical fertilisers are not usually necessary, but if used, apply in very small quantities to avoid burning the young plants.
Maturity and Harvest
Stone breaker matures quickly, usually within 8–12 weeks after planting.
The plant can be harvested once it reaches about 30 cm in height and begins producing flowers and fruits.
Harvesting involves cutting the entire plant close to the ground or selectively plucking mature leaves and stems.
For medicinal purposes, the plant is often harvested when it is fresh and green, as this stage contains the highest concentration of active compounds.
If storing for later use, the harvested parts should be dried under shade in a well-ventilated area to preserve their potency.
Pests and Diseases
Stone breaker is relatively resistant to many common pests and diseases, but it may still face challenges:
- Aphids are tiny insects that suck sap from the leaves, causing yellowing and stunted growth.
- Grasshoppers and caterpillars feed on the leaves, reducing photosynthesis and plant vigour.
- Root rot can occur in poorly drained soils due to fungal infections.
- Leaf spot diseases are fungal infections that may cause brown or black spots on leaves, especially during prolonged wet conditions.
Pest and Disease Control
- Cultural control: Maintain proper spacing to enhance airflow and reduce disease buildup. Avoid waterlogging and rotate crops to prevent soil-borne diseases.
- Organic control: Apply neem leaf extract, garlic spray, or wood ash as natural repellents for aphids and caterpillars.
- Mechanical control: Handpick visible pests such as caterpillars and grasshoppers.
- Chemical control: In extreme cases, use mild insecticides or fungicides, but ensure they are safe for medicinal plants and avoid excessive application that may affect the plant’s natural healing properties.
Hope this article was helpful.