Planting Shea Nut: See how to Plant Shea Nut

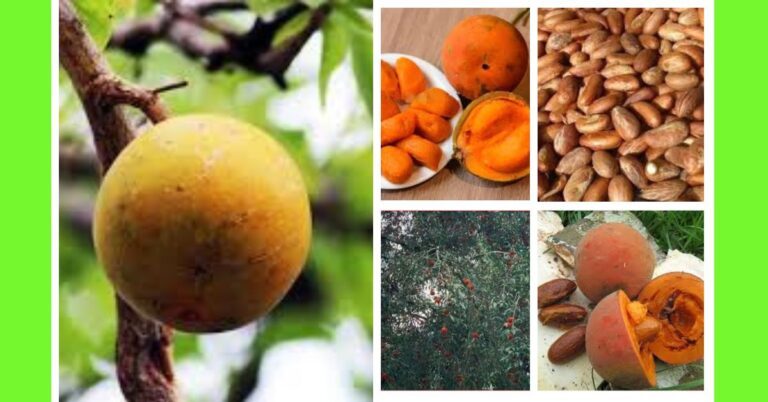
Shea nut, derived from the shea tree (Vitellaria paradoxa), is a significant agricultural product in West Africa.
Known for its high economic value, especially in the production of shea butter, the shea nut tree plays a vital role in the livelihoods of many Nigerian farmers.
If you want to grow shea nut and reap the rewards of this highly sought-after plant, this guide will take you through the essential steps of planting and cultivating it.

Let’s explore the entire process, from choosing the right location to pest management.
Description of a Shea Nut Plant
The shea nut tree, Vitellaria paradoxa, is a deciduous tree that grows primarily in the dry savanna regions of Africa.
It is known for its thick, corky bark, which helps protect it from bushfires.
The tree can grow up to 15-20 meters in height and has a dense canopy of dark green leaves.
Shea trees bear fruits about 4-8 cm long, containing the shea nuts used to extract shea butter.
These trees can live for several centuries. Their first fruiting typically occurs when they are 10-15 years old, and they reach peak productivity between 20 and 50 years.
Shea trees are highly valued for their nuts and ability to grow in harsh, dry conditions, making them a valuable resource for farmers in arid and semi-arid regions of Nigeria.
Planting Season for Shea Nut in Nigeria
The best time to plant shea nut trees in Nigeria is the beginning of the rainy season, which typically starts between April and June.
Once established, shea trees are naturally resilient to drought, but young plants need adequate moisture to ensure they thrive during the early stages of growth.
Planting at the onset of the rainy season provides enough water to establish the roots and support the plant’s growth through its first critical months.
Planting Shea Nut: A Step-by-Step Guide
Step 1: Choose a Location
Selecting the right location is crucial for the healthy growth of shea nut trees.
Shea trees thrive in tropical climates with temperatures between 21°C and 35°C.
The ideal soil for shea nuts is deep, well-drained, sandy loam soil that retains water well but doesn’t become waterlogged.
Avoid areas with clayey soils that retain too much moisture, which could harm the tree’s root system.
The site should also have total sunlight exposure, as shea trees require plenty of sunlight to grow and produce fruits effectively.
Furthermore, they prefer areas resembling their natural savanna habitat, meaning you should avoid swampy regions.
Step 2: Land Clearing and Preparation
Once the location is selected, clear the land of any bushes, weeds, and unwanted trees.
Land preparation is essential because weeds and other vegetation compete with shea trees for nutrients and water.
Clearing the land also helps reduce pest habitats that can affect the early growth stages of your shea nut plants.
Tilling the soil to a depth of about 50 cm is recommended to aerate the soil and promote root penetration.
Creating raised beds or ridges can also help improve drainage in areas prone to waterlogging.
Step 3: Means of Propagation
There are two primary methods of propagating shea nut trees:
- Propagation by Seed: This is the most common method, where mature shea nuts are planted in the ground. It is slow, as shea trees can take several years to mature and bear fruit.
- Propagation by Grafting: Involves taking a branch from a mature shea tree and grafting it onto a young shea sapling. Grafting can reduce the time it takes for the tree to bear fruit, but it requires expertise and is not widely practised by small-scale farmers.
Step 4: How to Plant Shea Nut from Seed
Planting shea nuts from seeds is the most straightforward propagation method. Here’s how to go about it:
- Select Mature Seeds: Ensure the seeds are taken from fully mature fruits. You can do this by harvesting ripe fruits, removing the pulp, and drying the seeds.
- Seed Pre-treatment: Before planting, soak the seeds in water for 24 hours to enhance germination.
- Planting Depth: Dig holes that are 3-5 cm deep. Place the seeds inside the holes and cover them with a thin layer of soil. Avoid planting the seeds too deep, as this could delay germination.
- Spacing: Shea trees should be spaced at least 10 meters apart. This allows enough room for their roots to spread and prevents competition for sunlight and nutrients as they mature.
Step 5: Watering
Regular watering is essential in the early stages, especially in areas with insufficient rainfall.
However, avoid overwatering, as shea trees prefer drier conditions once established.
A young shea tree should be watered at least twice a week during the dry season.
Once the tree is established (after two years), it requires less frequent watering and becomes drought-tolerant.
Step 6: Apply Manure
Applying organic manure, such as compost or animal dung, can help improve the soil’s fertility.
Organic matter enhances nutrient content and water retention, which are vital during shea trees’ early growth stages.
Apply manure during planting and top-dress the soil yearly, especially during the rainy season, to promote healthy tree growth and fruit production.
Maturity and Harvest
Shea nut trees begin bearing fruit between 10 and 15 years of age, with peak productivity occurring between 20 and 50 years of age.
The fruits resemble plums and take about 4-6 months to mature after flowering.
Harvesting is typically done between June and September, depending on the region and climate conditions.
Fruits are usually collected when they fall naturally to the ground.
Farmers then remove the outer pulp to extract the seeds, which are the valuable shea nuts.
Proper handling during harvest is essential, as shea nuts are sensitive to moisture.
After harvesting, the nuts are dried in the sun to reduce moisture content and prevent spoilage.
Pests and Diseases
Like any other crop, shea nut trees are prone to attacks from pests and diseases, which can negatively impact yield. Some common pests and diseases affecting shea trees in Nigeria include:
- Borers: Insects that bore into the tree trunks and branches, weakening the tree structure.
- Caterpillars: These pests feed on the leaves, reducing the tree’s ability to photosynthesize.
- Root Rot: Caused by fungi due to poor drainage or excessive moisture, it affects the tree’s root system, leading to stunted growth or death.
- Powdery Mildew: A fungal disease that affects the leaves, covering them with a white, powdery substance and reducing their ability to photosynthesize.
Pest and Disease Control
Effective pest and disease control begins with regular monitoring and maintaining proper plantation hygiene. Here are some ways to control common pests and diseases:
- Use of Organic Pesticides: Neem oil and other natural pesticides can control pests like caterpillars and borers.
- Pruning and Removal of Affected Branches: Regularly prune dead or diseased branches to prevent the spread of infections.
- Improve Drainage: To prevent root rot, ensure the soil has adequate drainage. You can do this by planting on ridges or raised beds in areas prone to waterlogging.
- Fungicide Application: Apply fungicides to treat fungal infections like powdery mildew. Ensure the application is done during the early stages of disease to avoid severe damage.
How Many Shea Nut Plants Can I Grow on an Acre of Land, and What Quality Can I Harvest?
Depending on the spacing, an acre of land can accommodate 40 to 60 shea nut trees.
The recommended spacing for optimal growth is 10 meters between trees.
This ensures that each tree has enough room to grow and spread its canopy without competing with neighbouring trees for sunlight, nutrients, and water.
The quality of shea nuts depends on factors such as soil fertility, care during the growing stages, pest and disease management, and harvest techniques.
Healthy, well-managed trees will produce high-quality shea nuts with higher butter yields.
An acre of well-maintained shea nut trees can produce several tons of shea nuts, which can be processed into premium-grade shea butter, highly sought after in international markets.
In conclusion, planting shea nuts in Nigeria is a long-term investment that requires patience and proper care.
Following the proper steps in site selection, land preparation, propagation, and pest management, you can enjoy high-quality yields from your shea nut plantation for decades.
Whether for local use or export, the demand for shea nuts and shea butter continues to grow, making it a profitable venture for farmers across Nigeria.
I hope this article was helpful.